Sunday, 26 October 2014

final design ideas

Final design ideas

I sketched a few different hairstyles which are possibilities for my final Elizabethan hair design. The sketches include a variety of techniques which I have learnt in previous lesson such as: crimping; curling; frizzing; plaiting and applying padding to the head.
My first idea was to applying padding to the hair to create volume. I will use the frizzing technique on the section of hair which will cover the padding. The remaining hair will then be French plaited into a spiral shape .I will then used the front section of hair to create pin tail curls which will be situated around the face.


This is what my final design will look like from the front and the back .

anonymous. (02/04/2014). 02 announces exclusive priority partnership for Beyonce's UK leg of the Mrs carter show world tour. Available: http://news.o2.co.uk/2013/02/04/o2-announces-exclusive-priority-partnership-for-beyonces-uk-leg-of-the-mrs-carter-show-world-tour/. Last accessed 14/10/14.

My inspiration for my first design was Beyoncé's hair design for the O2 advert. I really like the frizzing technique which has been used on this design in order to create and Elizabethan effect.


Unusual braided updo #hairstyles #hairstyle #hair #long #short #medium #buns #bun #updo #braids #bang #greek #braided #blond #asian #wedding #style #modern #haircut #bridal #mullet #funky #curly #formal #sedu #bride #beach #celebrity  #simple #black #trend #bob
anonymous. (2014). mermaid shell braid. Available: http://www.pinterest.com/pin/514817801126342619/. Last accessed 26/10/14.

Another inspiration for my final design was the French plaiting technique used in this style .
My second design will also include the padding technique. The section of hair which will be situated over top of the padding will be smooth and sleek . I will then take a section of hair from the front of the head and create a French plait around the front of the head. The remaining hair a the back of the head will be made into a bun, and I will create a caul which will be situated over top of the bun using a form of netting and beading.
This is a sketch of what my second design would look like  from the front and the back.
Perfect Hairstyles for Prom In 2014

anonymous. (2014). perfect hairstyles for prom in 2014. Available: http://www.beautyinfashions.com/perfect-hairstyles-prom-2014/prom-hairstyles-for-long-hair-2014/. Last accessed 08/11/14.

This was the inspiration for my second design. I like how the designer had created a modern contemporary look and incorporated the Elizabethan era by creating an oversized low bun, with a caul situated over top.

My final design idea also includes the padding technique which will be heart shaped to create an Elizabethan effect. the hair overlaying the padding will be smooth and sleek. the remaining hair at the back of the head will be French plaited with ribbon weaved through , the ends of the ribbon will be made into a bow  Finally I will curl the ends of the braid using the curlers to tie the whole look together.

The sketch shows what my design will look like from the front and the back.
french braids with ribbon in between - Google Search
Jenny's hair days. (unknown). unknown. Available: http://www.pinterest.com/ofeliahoyos3/trenzas/. Last accessed 26/10/14.

This was the inspiration for my final design. I like how the designer had incorporated the ribbon into the French plaits in order to create a corset effect. The look is generally quite Elizabethan during the 1550s the Elizabethans would incorporate many materials such as ribbons feathers and pearls into their hair.

After speaking with Helen about my final design ideas she thought they were generally good ideas and need to focus on practicing one of them for my final design.

Thursday, 23 October 2014

padding and shaping the hair

Week 3 adding padding to hair


In order to create an Elizabethan hairstyle I had to carry out a variety of techniques such as curling crimping and plaiting before adding rats which are form of padding to the hair.


I firstly started on half the head and took a section of hair from the front of the hair to about the temples on the face  and then  started  to curl the sections the curls at the front of the head I generally wanted them to be tight curls in order to make pin curls to go around the front of the hair line.
 I then took another section of hair bigger than the section I added the curls to as this section will have to have enough hair in order to cover the rats when it is secured to the head.
 Then I French plaited a small section of hair which will act as an anchor to secure the rats to the head, in order to keep the plait in place I overplayed the end of the braid over top of the plaited section attached to the head and secured it with hair pins.
Next I added the rats to the hair which will act as the padding. The rats are easily made using tights and couch roll paper. I pierced the rats using a hair pin which is then attached it to the braid in order to hold it in place .I carried this process out several times in order to hold it in place so when styling the hair there will be no movement.
Once I secured the rats to the braid I then used the crimped piece of hair and overlaid it over top of the rats to cover it , I then tucked the ends of the hair under the rats and secured the hair in place using hair pins. If there is a large amount of hair to cover the rats  this can usually be quite heavy causing it to drop and look messy, in order to make the hairstyle look overall neater and more secure its usually best to section the crimped pieces of hair into three and then pin each section to the hair .
In order to tie the whole Elizabethan look together using hair pins I pulled some of the curls over top of the crimped section of hair and then used the rest of the curls to create pin tail curls which I situated around the face on top of the hair line.
I then carried out the same process on the other half of the head. This is my finished look.
This is a side view of my finished Elizabethan look with padding used to add volume to the hair.
I found I  sectioned the hair well in order to make the curls and crimped section of hair look neat and even. I found it quite difficult to secure the rats into the hair .Overall I thought the Elizabethan look I created  was neat but could have included more volume perhaps by securing the rats higher into the hair, the pin tail curls also needed to be neater.

Once I had finished the design i asked Lottie her general opinion on my attempt at an Elizabethan hairstyle she thought the design was a nice idea and a good attempt.
The things i needed to focus on however, was making sure the pin tail curls were more secure around the hairline and the hair pins holding the curls in place were disguised a bit better.

experimenting with Elizabethan hairstyles using padding

I experimented with the different techniques I've learnt from previous lessons such as crimping, curling, plaiting and adding padding to the hair. to create my own interpretation of an Elizabethan hairstyle.
firstly i sectioned the hair into two and the French plaited two sections of hair at the back of the hair this will act as an anchor and secure the padding in the hair.
next I applied the padding to the French plaits using hair pins. I decided to situate the padding further back in the hair rather than closer to the front of the head due to the frizzing technique i used on the section of hair which would cover the padding would create a lot of volume and the length of the models hair was generally quite long so i was therefore able to get away with placing the padding further towards the back of the head.
On the section of hair which would be used to cover the padding I used a Geisha pin I weaved sections of hair through the pin and applied the hair straighteners over top of the weaved piece of hair I then removed the pin which left me with a zig zag curl. I then slightly brushed the zig zag curl out to create a frizzed effect which would create volume. I carried this process out until all of the hair which will be used to cover the padding was frizzed then I overplayed the section overtop of the padding and secured in place using hair pins.
Finally with my third section of hair which was a slightly smaller section, using my curlers i created pin curls which I then situated around the front of the hair line and secured in place using hair pins.

After carrying out the French plaiting, applying the padding to the hair, the zig zag curling, and the curling this was the outcome of my final Elizabethan hairstyle.

Even though my Elizabethan style did not include much volume I feel the pin tail curls look neater than my first attempt and the hair style looks neat and secure.

Research

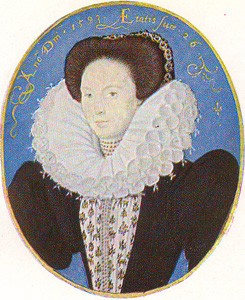
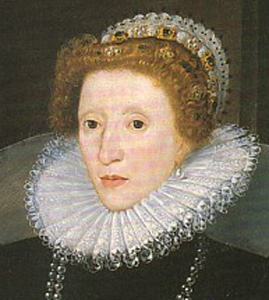
It is noticeable that most hairstyles in the Elizabethan era were either rounded or heart shaped and pinned back off their faces. when working applying padding to the hair the main aim was to make sure the hairstyle was shaped appropriately in order look Elizabethan. The outcome of the Hairstyle also needed to be symmetrical.
Emilia Bassano 1593Queen Elizabeth 1580
anonymous. (1580). Elizabethan hairstyles. Available: http://trystancraft.com/costume/2011/07/15/elizabethan-hairstyles-1560-1600/. Last accessed 23/10/14.

anonymous. (1593). Elizabethan hairstyles. Available: http://trystancraft.com/costume/2011/07/15/elizabethan-hairstyles-1560-1600/. Last accessed 14/10/14.

The image of Emilia Bassano 1593 ( left ) highlights a prominent heart shaped heart style and the image of Queen Elizabeth 1580 (right) highlights the rounded hairstyles the Elizabethans used to wear.


I researched a few contemporary hairstyles which relate to the techniques and styles I used when creating my own interpretation of an Elizabeth an hairstyle.


Thom Browne . (2014 spring). Thom Browne New York spring 2014. Available: http://www.stylebistro.com/runway/Thom+Browne/New+York+Fashion+Week+Spring+2014/Details/BMlVeJs3WG0. Last accessed 23/10/14.

 In this image from New York fashion week it is recognisable that stylist Thom Browne has used a lot of back combing to achieve the volume he has in the Image. The look is overall very Elizabethan due to Thom Brown including a red coin with pearls attached to the models hair. In Elizabethan times it is known during the era pearls and red was worn particularly to highlight wealth.

I like how Thom Browne has incorporated colour into his hair design, I also like the use of the coif in the hair which ties the whole Elizabethan look together.  The colour scheme of red and white used in this overall look is also very Elizabethan.


Davis Bitton. (2010). Elizabethan age-up style. Available: http://www.hairfinder.com/hairstyles5/davis-upstyle12.htm. Last accessed 23/10/14.

Here is  Another modern interpretation of the Elizabethan hairstyles this style is created by Davis Bitton .  In order to create such a smooth rounded style it is possible that padding has been added underneath the hair to create such a prominent shape and volume. The look also can be considered as very Elizabethan due to the style of plaits situated across the front of the padding. According to the article, Davis Bitton aim was to keep the hair off the models face and to shape the hair to look like a coif fitted to the head in order to create an Elizabethan effect.

I like how the artist has create such a smooth speak look with the hair. I also like how Davis Bitton has used the extra piece of hair to create a coif in this style to create an Elizabethan like effect this idea is very clever.

anonymous. (unknown). unknown. Available: http://uk.pinterest.com/pin/319685273523522733/. Last accessed 23/10/14.

The image used on the front of a fashion magazine to portray the fabulous Elizabethan has many different techniques used, such as a variety of plaiting techniques and pin tail curls situated around the face. There is also a possibility that the volume achieved in this look o's gained due to the padding

I like how the artist incorporated a variety of different techniques such as them pin tail curls padding to gain the volume of the style and mainly the plaiting techniques used. The plaiting technique used is almost like a basket effect and is very effect.


curling and crimping hair

Week 2 curling and crimping hair

During our technical lesson I learnt how to curl and crimp hair. On half of the mannequin head the first technique I try was curling.

I started to curl the hair starting from the bottom of the head , first of all I made sure my first section was straight using a fine tooth comb in order to , make all the curls on the head even I took a fine piece of the hair from the section and started to curl the hair from the end to the root. I was cautious making sure there were no ends when carrying out this process otherwise my curls would end up with fish hook ends .

I then began to wind the curl up towards the roots making sure the curlers were facing upwards this helped me to achieve tighter curls, I left the curlers in the hair for approximately 12 seconds and then began to wiggle the curlers out of the hair to maintain tight curls.

I carried out this process until I got to the temple then I changed direction of my curled which would be at the front of the head I took my sectioned piece of hair holding it above the head and then began to wind the curlers down to the root this helped me to get a tighter curl I then left the curlers for approximately 12 seconds and then started to wiggle the curlers out of the hair by doing the front curls using this method this gave the curls more volume.


Once I had finished sectioning and curling the hair this was the final outcome. I felt I curled the section of hair well due to sectioning each piece of hair evenly making the section look even and neat. After speaking to Lottie about the outcome of curling the hair, she was generally happy with the outcome and explained that by sectioning the hair this is why the curls look neat and even.
I took a photograph to convey the volume of the curls at the front of the head by curling the sections of hair at the front by holding the hair up above the head and bringing the curlers down towards the root .

Crimping hair

When crimping firstly I had to section my hair using a fine tooth comb starting from the bottom of the head , I then began to crimp the hair by starting from the root and then working my way down the hair . I carried out this process until the whole of the hair on the head was crimped . If the client has damaged or fine hair I had to consider whether the temperature on the heated product needed altering or not.

Once I finished curling and crimping, both sides of my mannequins head I nearly order to create an Elizabethan look and add volume to the hair I then slightly began to brush the hair.
I found I was able to crimp hair quite easy by sectioning the hair this helped to make the section look a lot neater.


Once I brushed the curls out it is noticeable that the hair has gained more volume.
even though the hair had more volume once I brushed the curls out I did not  like the overall look.
I slightly brushed the hair once crimping it to convey the amount of volume which has occurred.
once I brushed the crimp out of the hair I thought the volume it created made the style look more Elizabethan
 

Tuesday, 14 October 2014

elizabethan hair

Elizabethan hair techniques

Using my techniques of creating a bun and plaiting hair from my previous practical hair lesson I began to start experimenting and developing ideas for my final elizabethan hairstyle.
This was my first attempt at an Elizabethan hairstyle I used the technique of a fish tail plait separating the hair in to two sections and the overlaying pieces of hair for  each section as I carried out this process I also began weaving ribbon through the plait in order to give it an elizabethan look once I finished plaiting the hair I then decided to twist the end of the plait under the hair in order to make the hair look like a low bun.
In this design I found it quite difficult to weave the ribbon through the fish tail plait. After speaking to Helen she explained the idea was nice but was generally quite difficult to accomplish without the ribbon being hidden.
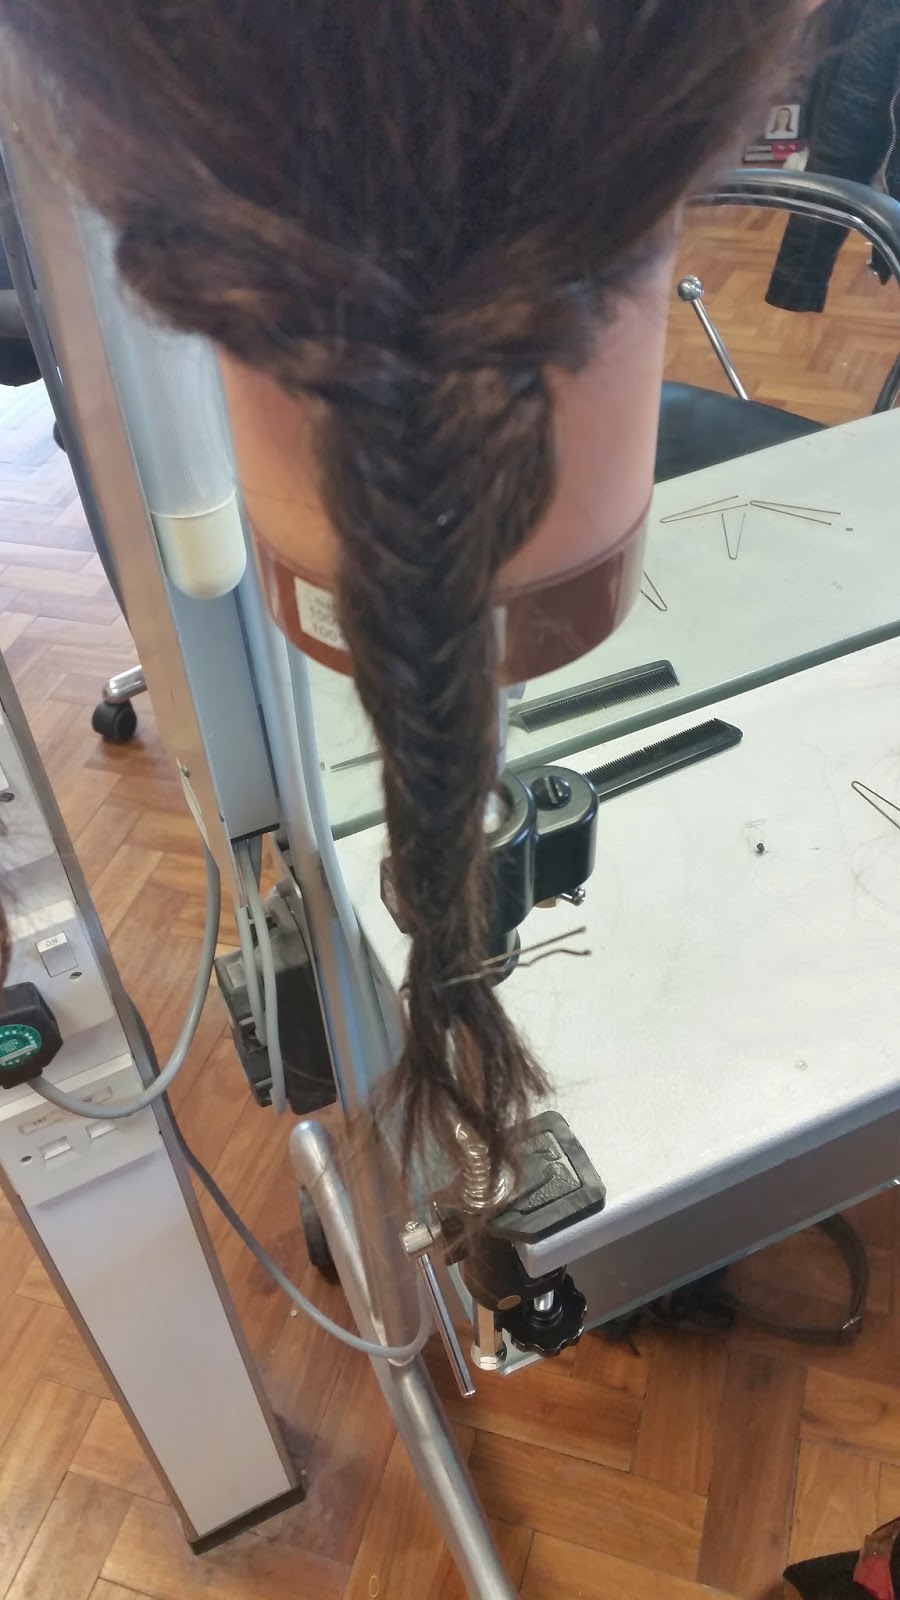
This was my second attempt at a fish tail plait with ribbon weaved through it, overall I think my first attempt at this hairstyle was better than the second attempt.


Hairstyle How To Bella Thorne Blue and Green Fishtail Plait


Samriddhi. (13/03/13). hairstyle:how to. Available: http://www.glamcheck.com/fashion/2013/03/13/fishtail-plait-interlaced-with-ribbons/. Last accessed 30/11/14.
The image of a fish tail plait with blue ribbon incorporated into the plait was my inspiration for my first attempt at an Elizabethan technique. It is recognisable that the Elizabethans liked to incorparte materials such as ribbons and feathers into their hairstyles.
This was another attempt I had at an elizabethan hairstyle I achieved this look by doing a french plait on each side and the twisting the ends of the plait up into the hair.
After creating the design I felt it was a good idea but looking back on the design I feel it looks messy by incorporating a bun with the remaining peices of hair this may of helped to avoid the hairstyle looking untidy.
Melissa. (3/10/13). double dutch braided bun. Available: http://www.missysue.com/2013/10/double-dutch-braided-bun/. Last accessed 30/11/14.


The image of two braids pinned together gave me the inspiration for an Elizabethan hair technique. The Elizabethans were well known for having their hair pinned back with a variety of braiding techniques incorprated into their hair styles.

This was my second attempt at the two french plaits instead of twisting the ends of the plaits up into the hair I combined both the plaits at the bottom into a single plait.
 I felt this design looked better than my previous design
Dutch Combination Braid Hairstyle
franny. (2008-2014). braids braids braids. Available: http://www.frannyslonghairstyles.com/braids.htm. Last accessed 30/11/14.

The image of two french plaits being plaited into one was the inspiration for another Elizabethan hair technique i decided to attempt. The Elizabethans were well known for their hairstyles incorporating a variety of different plaiting techniques similar to this style.
In my own time I created this Elizabethan hairstyle on real hair I achieved this look by beginning French plait on the right side of the head and then carrying on the plait around the head instead of straight .

I was happy with the outcome of the design i created in my own time as it looked generally quite neat and was also the first attempt i had at plaiting real hair rahter than synthetic hair on a dolls head.

 
anonymous. (2014). hair by mistresses. Available: http://www.celebwigs.com/fishtail-hair-band. Last accessed 30/11/14.

The contemporary image of a french plait being situated around the head is another inspiration for an Elizabethan hair technique. The Elizabethans were known to have there hair plaited and pinned back off their faces.


Curling and frizzing 

Another technique I learnt was how to curling hair using a geisha clip and a hair pin and then applying a brush slightly to make the hair more frizzy and add volume. I sectioned a small piece of hair and weaves the piece of hair in and out of the geisha pin in a figure of eight. Once i came to the end of the hair I secured the technique with a hair pin. I then applied the a hair straighteners to the weaved piece of hair . When the the top layer of hair had a slightly shiny surface I then removed the straighteners and waited for the hair to cool slightly. Finally I removed the hair pin and geisha pin and was left with a zig zag like curl. In order to add some frizz and volume I slightly brushed the curl.
  After my first attempt at a zig zag curl i was generally quite happy with the outcome and felt confident with the technique. I also have considered using this technique in my final design .
 Once I brushed out the zig zag curl it highlighted the amount of volume created by carrying this out. I also considered using this idea in my final Elizabethan design in order to create volume.
I brushed out the zig zag curls and pinned them backin order to portray volume .


References

Two different references one being modern and the other in the Elizabethan era both have hairstyles which are good examples or the zig zag curls and the frizzing technique and also good ideas to experiment, enter with in order to create my final Elizabethan hairstyle. 
Isaac Oliver. (c.1600). The rainbow portrait . Available: http://www.andrewgrahamdixon.com/archive/readArticle/245. Last accessed 30/11/14.


 The rainbow portrait painted by Isaac Oliver includes both of these techniques the frizzing effect which is created by the zig zag curls being slightly brushed out to create volume has been used and pinned back in order to create volume to the front of the hair and the loose pieces of hair have also been zig zag curled using a geisha pin.
anonymous. (02/04/2014). 02 announces exclusive priority partnership for beyonces uk leg ofthe mrs carter show world tour. Available: http://news.o2.co.uk/2013/02/04/o2-announces-exclusive-priority-partnership-for-beyonces-uk-leg-of-the-mrs-carter-show-world-tour/. Last accessed 14/10/14.

The modern Elizabethan style hair created for Beyonce s 2013 advert for the 02 also includes the technique of frizzing . It is noticeable that her hair has been zig zag curled and the brushed out to create volume .

Wednesday, 8 October 2014

plaiting hair and creating a bun

Week 1 

Plaiting hair

The first technique I learnt was a simple plait . In order to create a plait in the hair I had to separate the hair into three equal sections, then overlap the middle section alternately over each of the end two  sections, and keep repeating this process until I nearly reach the end of the hair. I had to add a hair tie to the end of the plait to keep it secure and in place.
After my attempt at creating a simple palit i was generally quite  confident with the technique.


I then had a couple of attempts at a French plait  which was the next technique I learnt , I sectioned a small part of hair starting from the top of the scalp using a fine tooth comb and sectioned it into three equal parts as I began to start plaiting the hair I would then start adding small sections of hair from each side and overlay the piece of hair on the middle section, each time a piece of hair is added to the middle section I would then rotate the sections to the right plaiting the hair I kept repeating this process until I reach the end of the hair, I then add a hair tie to the end of the hair to secure the plait in place.


 I thought my first attmept wasnt bad but the sections were slightly messy. After speaking to Lottie about my first attempt on a french plait she explained the thing i needed to focus on in order to make the plait look overall  neater was to focus on sectioning the hair before incorporating it into the palit in order to make it look more even.
. I thought my second attempt at french plaiting hair was an improvement from my first attempt.


Fish tail plait

Fish tail plait was the next style of plait I learnt which I had two attempts at , I section the hair into two, I then add a thin piece of hair from the right side and overlay on the left section of hair, holding it in place I then grab a piece of hair from the left and overlay it on the right section of hair , I kept repeating this process to create a fishtail effect cautious of not holding the plait too tight otherwise it would ruin the structure. I then secure the fishtail plait with a hair tie.


First attempt at a fish tail, for my first attmept i was generally quiet happy with the outcome. After speaking to Lottie about my first attempt at a fish tail she said that it was a good attempt and like how the plait was loose and the sections werent pulled too tight.
Second attempt at a fish tail plait 
overall i found fishtail plaiting quite easy but felt the start of the plait was quite difficult as it always looked untidy.


Buns

A high bun without using a donut but with structure was another technique I learnt , I had a a couple of attempts at this technique, I started styling  the hair into a high ponytail securing the hair tie to make it stable so it would  not move about I then took a section of the hair and back combed the root of the section underneath to create volume I then smoothed the top of the section over with my comb and kept the section in place with a hair pin I carried this process out three more times leaving me with four sections. I then joined all the sections together by making sure the was no gaps I was able to close the gaps easily due to the back combing leaving me with more movement I then secured the bun by adding four hair pins to each of the sections in order to do this  I had to apply the hair pins pushing them across the scalp to stop the bun from moving out of place, when adding the hairpins I had to be cautious not on place the hair pin into the hair incorrectly damaging the bun.

overall i found creating a bun without a donut quite simply however i felt when joining the sections together it became untidy this may have been due to the type of hair i was using was curled.

my first attempt at a bun without using a donut. I was happy with my first attempt but felt the bun looked generally quite messy , after speaking to Lottie she expalined it was a good attempt and the reason why it looked quite untidy was due to the hair on the dolls head being wavy.

Second attempt at a bun without using a donut


research on contemporary plaits and buns

I researched some images on the different styles of contemporary buns and plaits.

beautylish. (unknown). how to french seashell braid. Available: http://www.polyvore.com/how_to_french_fishtail_seashell/thing?id=64864046. Last accessed 30/11/14.


The contemporary image of a french plait also incorprates some elements of the Elizabethan era. The Elizabethans were known for having different styles of plaits included in their hairstyles.
I like how the plait is extended into a spiral shape .


Hairstyle How To Bella Thorne Blue and Green Fishtail Plait
Samriddhi. (13/03/13). hairstyle:how to. Available: http://www.glamcheck.com/fashion/2013/03/13/fishtail-plait-interlaced-with-ribbons/. Last accessed 30/11/14.
The contemporary image of a french plait with ribbon also highlights some elements of the Elizabethan era. It is known that the Elizabethans liked to incorpate materials into their hairstyles such as ribbons, pearls and feathers.
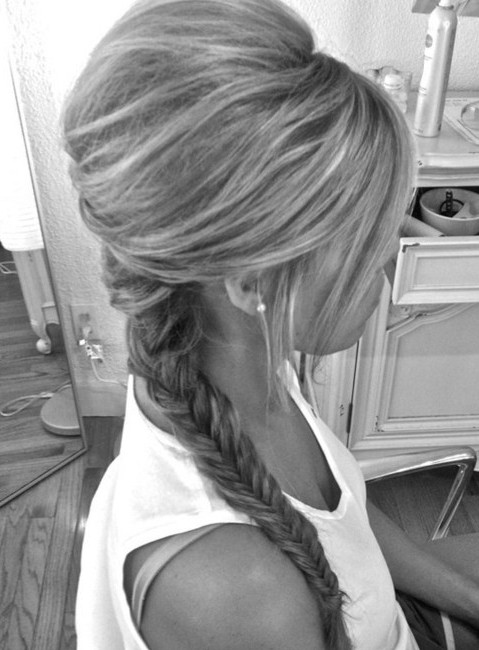
Cute Fishtail Braid for Girls
jessica. (november 2014). latest popular hairstyle for girls. Available: http://hairstylesweekly.com/cute-fishtail-braid-for-girls-latest-popular-hair-style-for-girls/. Last accessed 08/10/14
The contemporary image of a fish tail plait highlights some elements of the Elizabethan era. The Elizabethans incorporated many plaiting techniques into their hairstyles, they were also known for having hair styles which contained a significant amount of volume.
Perfect Hairstyles for Prom In 2014

anonymous. (2014). perfect hairstyles for prom in 2014. Available: http://www.beautyinfashions.com/perfect-hairstyles-prom-2014/prom-hairstyles-for-long-hair-2014/. Last accessed 08/10/14.

 The contempary image of a low bun also highlights some elements of the Elizabethan era. The caul which is situated over the oversized low bun is a common piece of headgear all which all Elizabethan women wore.

Zareen. (2013). womens hairstyles for EID 2013. Available: http://www.style-den.com/women-hairstyles-for-eid-2013/. Last accessed 08/10/14.

The contemporary image of a side bun with pearls incorporated can be regonised as a very Elizabethan look. The Elizabethans were known for incorprating pearls and jewells into their hairstyles, especially if they were wealthy. Analysing this image it is noticeable that the stylist has incorporated some twists and plaiting techniques into this style of un, this also remind me of the Elizabethan era, not only were they well know for have the hair styled into a bun they also incorpated many other techniques into their hairstyles such as twists and plaits.

Hairstyle trends s-s 2012 puffed buns
Akriti. (2012/02/07). 2012:buns and futuristic updos. Available: http://www.glamcheck.com/fashion/2012/02/07/hairstyle-trends-ss-2012-buns-futuristic-updos/. Last accessed 08/10/14.
It is noticeable that the contemporary of a puffed bun has been styled using plenty of backcombing to create its volume. This style reminds me of the Elizabethan era due to many of their hairstyles including plenty of height.